Pages

Sunday, May 31, 2015

First Units of the British Intervention Force Arrive - Pictures Edited


 The first units of the British Intervention Force (BIF) have arrived. These were painted by my game co-host Mike M and are just superb.  Completed to date are 3, 24 fig Infantry battalions, a high command stand and an officer.  In the pipeline are a unit of Lancers, 3 more infantry battalions and some more artillery.  All of the miniatures are 28mm metals from the Perry British Intevention Force line.  They are wonderful sculpts.

A close up of the infantry.  Mike really did a nice job on these.  I really like the crisp red iniforms and think they look splendid on the tabletop when marching alongside the confederate greys and union blues.

The command stands.  My pictures do not do the High Command stand justice - It's amazingly painted and a real gem.

Lastly a close up of the infantry.

How will these plucky Brtis do against the battle hardened Union forces on the tabletop?  You'll need to register for my games at Historicon this year to find out  T-340  - F-341 in the HCON PEL.


Saturday, May 30, 2015

Historicon 2015: My games are on the PEL

The two games that Mike and I are running are up on the Historicon PEL  - the PEL can be found here:

http://hmgs.site-ym.com/?page=HconEvents

My games are
T-340, Thurs from 2:00-6:00pm
"Decision in Delmarva Part 1: The British Force a Landing
A 1/600 scale naval battle pitting a Britsh/CSA fleet against the battered remnants of a Union navy trying to block the landing of a Britsh army in the Delmarva peninsula.  The outcome of this game sets the stage for Friday's land battle. 

F-341, Fri from 2:00 - 6:00
Decision in Delmarve Part 2: The Assault
A combined British / CSA army will either attack the Union if the landings in the previous game are succesul or an out numbered CSA force will be defending against a larger Union force and hoping that the British reinforcements that were forced to land further down due to loosing the naval encounter arrive in time.  This game will use the Longstreet Ruleset with 28mm scale mini's including the new Perry British Intervention Force figures.  Each side will have over 20 battalions on the table.

If your going to Historicon - consider signing up - the games will be fun and the prizes are beyond your dreams of avarice (well maybe not all that big but still good)

Also check out the Architects of War "All Quiet on the Martian Front" games at the con this year.  The game last year was spectacular and this year promises to be even more impressive.

Wednesday, May 27, 2015

Sectional Terrain: Lots of Wood Cut

Last night I was cleaning up my terrain making mess and decided to cut the remain 1x2 lumber needed to build the remaining terrain panels.  So far 1 2x4 section and 5 2x2 sections have been assembled and I still need to build 4 more 2x4 sections to provide a 6x10 playing area.

By the way, I don't know about you but I create a terribleness when terrain making.  I've tried to be organized but fail epically.

When cutting lumber, it's best to do it in a large batch.  It's important to be "in the mood" so the cuts are precise and you end the session with the same number of fingers attached as you started.

Each 2x4 panel requires 2, 24" lengths for the short edges, 2 46.5" lengths for the long edges and 1 22.5 inch length to run down the middle as a support.  The outer edges are placed on their 0.75 inch side and the central support if placed on it's 1.75 inch side.  As you can surmise from the dimensions I'm using butt joints rather than miter the edges.  Why? butt joints will provide a bit more strength and these aren't furniture.  I will dress the sides up with a gunstock varnish which does a good job hiding the edges.

One of the lumber pieces was a bit warped so I broke out some clamps and locked it in position to work out most of the warping.  One can never have too many clamps when building something with wood.  I've got over 100 of the orange handled clamps above and have worked on projects where they've all been in use at the same time.

Lastly, at the very top of the photo are the new edges for the hill sections 2, 18 inch and 2, 9 inch matched mitered edges.  These will raise the hill profiles from the current 2 inches on the edges to 3.5 inches but it's worth a little redo work to get rid of that ugly gap.

One of the 2x4 sections will have a river running through it length wise so I'll need to cut opening in the edge sections to allow the 3.5 inch wide river through.

After cutting the river exits, the next step will be to assemble the sections.  I use water proof wood glue as the main binding agent and brad nails to hold the sections in place.  Once the glue dries the wood will break first before the bond so these panels are really solid.  After that theres a lot of sanding to ensure the edges match up up to each other and no splinters for players.

Not the most exciting of updates, but it's a necessary one.


Tuesday, May 26, 2015

Long Weekend & a New Airbrush

 It was a wonderful weekend here in St Michaels - steady wind from the south at 12-15 knots.  Sean and I took the Bucentuare out on Sunday.  Our original plan was to practice turns for an upcoming regatta but that quickly thrown overboard as it was just too nice.

 The St Michaels harbor was jammed and there were at least 60-65 boats anchored outside.  Sadly, there were a lot of power boats flitting about.  Sailboaters are legally required to both look down upon and say snide things about power boats and their owners.  It's just the nature to things.
 It was a near perfect day to sail.  We got in 26 nautical miles in 3.5 hours so averaged 7.4 knots/hour.  At one time we had her at 9.1 knots for a few minutes.
 We did pass a beautiful schooner - I thinks it's a Hinkley but I'm not sure.   One day......
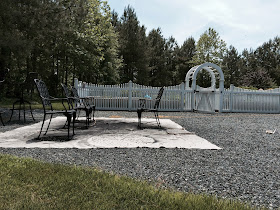
 I did get some painting time in over the weekend.  Unfortunately, it was wife-sanctioned painting of our patio furniture.  The first step was a quick test to ensure spousal approval.  I've learned NEVER to skip this test on any sanctioned project as the ramifications can be very bad.  Once the required approvals were obtained, documented, notarized and filed for safekeeping I went about the business of painting.  I've been seeing a lot of post on the value of an airbrush for our hobby so wanted to really try one out.  So here goes.....
 To be honest I'm not sure how people paint miniatures with one of these things.  It puts out a lot of paint but man it took like 40 eye dropper bottles of Vallejo black to fill up the paint reservoir.  
Nearly done.  We ran out of black paint before finishing the last few chairs so there will be some follow on work next weekend.  My son did have a bit of a mishap.  While spraying some water through the paint gun to clean it he got a little careless and managed to hit the far right corner of the white garden fence - which now has a bunch of spots in some crazy monochromatic leopard spot design.  It's a race to see if he can repaint that part before his Mom discovers the error.

By the way, you can catch a glimpse of my lovely yet fierce wife in the last picture - the turquoise spot in the center.  She says she was planting herbs but I think she was keeping an eye on Sean and me.

Monday, May 18, 2015

First Sail of the Season: 39 Nautical Miles logged

The Bucentaure saw her first sail of the season with a trip from her wintering spot in Annapolis to St Michaels where she is moored during the summer months.  The trip was made even more eventful as it was the first sail of the season with my son who has recently completed his second year of college and returned home for the summer a few days prior.

On the way out of Annapolis harbor, we passed an Osprey nest on top of a channel marker.  The weather for the trip was just about perfect - 10-12 knot steady winds, relatively calm seas and temps in the low 70's.  The only downer was the direction of the wind - it was blowing south to North and we needed to go south which meant a lot of tacking (zig-zagging for you land lubbers) and turned a 29 nautical mile trip into a 39 nautical mile one.  It took us 7 hours to make the passage.
Finally under sail.  You may notice that the jib's still furled.  When we first unfurled it, we saw that it wasn't installed properly.  While we could have attempted to fix it underway, it's not the safest thing to try to do in a pitching boat so we elected to furl it back up and repair the mounting at dock.  It cost us 2 knots of speed but it was such a nice day we really weren't in a rush.
 Tacking across the Bay meant play tag with freighters heading up to the harbor in Baltimore and it was a busy, busy day for commercial shipping.
When you're in a sailboat, Freighter can move pretty quick - here's ones a good bit away, but
 Seven minutes later....
 Another giant speed demon
A big 'ole container ship
 The bloody point light house - about the halfway point of the trip and makes the transition for the Chesapeake Bay proper and the less trafficked East Bay.  Given the wind direction, the East Bay transit was a straight shot.  About half way through the East Bay we elected to practice some "Man Over-Board" drills which entail one of the crew pretending to fall overboard (we throw a flotation cushion into the water) and the remaining crew member needs to handle the boat alone to turn and retrieve the "crew member cushion".  It's a pretty basic but really important maneuver to practice often as when the real thing happens one needs to be able to overcome the natural emotions of fear to pilot the boat to get the crewman.  We each did the drill three times.  Sean's all went well but my first one was a bit of a mess (I ran over the cushion!).  The drill is performed without using the boat's motor.

After transmitting the East Bay we entered the Miles River and sailed into St Michaels.  Once the boat was moored in her slip we spent about an hour fixing the jib sail rigging and cleaning up the boat.  After that my wife came over and we had dinner at the Marina.

There was a wedding reception at the Marina but no wedding party.  About halfway through our dinner we swath arrive via boat - only on the Eastern Shore.

All-in-all it was a good but long day on the bay and the Bucentaure has logged her first 39 Nautical miles of 2015.

Friday, May 15, 2015

Sectional Terrain: Hill sections done but.....

 The basic scenting for the hill sections is done and you can see a few pic's of the two sections put together.  There's an obvious problem - the 1/4 inch gap, which seems to have occurred when the foam on the left section slide in while glueing.  It's not completely square and hence the gap.

The easiest way to fix this is to simple trim 3/4's an inch from the ends of each section and replace that with some 1x2 lumber that's trimmed to match.  Doing so will ensure a clean fit and serve to better protect the sides when the units are in transit.

 Given the lighting in my workshop, I've decided to put off any of the detail screen work until I can move the sections inside and lay them out on my gaming table.

 The lighter shade at the top of the hills needs to be toned down a bit but is there to serve as a playing add to clearly make the hill tops.
 Overall, despite the issues matching the ends, I'm happy with how these came out.  I knew I had to reinforce the hill ends so the minor demo work really isn't that big of a set back.
The basic ground cover of the river get section has been put down.  I'm debating is the river should be shallow and thus have a sandy bottom visible or deep and just painted.  I many compromise and just put the shady bottom where the ford is.

Monday, May 11, 2015

Sectional Terrain: More mountains and a river


 A bit more progress on the "mountain" sections with the basic ground paint being applied.  I have noticed that the grout / white glue mix takes a very long time to dry when it's more than 1/16 of an inch thick.  I may switch to using hydrocal plaster or plaster cloth for basic contours and then keeping the coating of grout very thin.  The rock faces have also been carved into the two sections.
 Lighting can be a funny thing in pictures - the shade of light brown is the same between the two sections but shows up much darker in the pic.  My garage workshop could use some better lighting.
 Some "boulders" ready for painting.  Just random pieces of foam foam from cut-offs that are tacked down to a piece of 2x4 and awaiting painting.  It's easier to put paint boulders separately and then apply once the basic ground foam is down - keeps unwanted glue and flock from getting on them.
 While I was waiting for the mountain sections to dry, I decided to add the plaster contours to the river bank and then texture with my trusty grout/white glue mix.  The banks are lined with plaster cloth and then covered with grout.  The river is 3" wide and enters/exits each board in the middle.  Once I get comfortable I can do the water (which is a tricky subject) a 2x4 foot river section will also be built.  About 1/3 of the way from the top of the picture there's a spot for a ford.  The plan is to scratch build a few bridge options (one in 15mm and the other in 28mm scale) so there's a few methods to cross.  As Sunday May 10th comes to a close, 24 square feet of the planned 70'ish is close to done so progress is being made - which is good 'cause my time allowed to lobby stuff is about to take a big hit....

My sailboat goes in the water this week.  The anti-floulent paint on the hull (the red) had to be repainted as it was peeling off (the builder didn't do it right).  I've still got to have the electronics installed (depth finder, GPS plotter and wind gauge) but that's supposed to be done early this week.

Despite the distraction the Bucentaure poses, I'm still feeling comfortable about getting everything done in time for Historicon.  We shall see....

More Stupid Terrain Modeler tips - this is a rolling list of things I've learned while doing this project

(1) Ground foam crops look awful when they are different sizes and not spaced evenly - take the time to add details in the right way and don't rush

The additions from this post:

(2) Gravity stays in effect while building terrain.  I had forgotten that water flows to the lowest level and after leaving the risky depression board to dry overnight and came in to discover that the diluted glue had kept into the sand bottom and brought along enough flock to cover it - the whole section had to be redone.  I should have put some dam's in place.

(3) Plaster cloth is great for terrain but don't but the hobby version which is expensive - buy the cloth from a medical supply house (it's the stuff used to make casts) - you can get 5x the amount for 1/3 the price.


Sunday, May 10, 2015

Ray's 500th Post

WARNING: Any images in this post may be unsettling and have been known to scare livestock and cause varicose veins.

Ray's celebrating his 500th post over at his blog "Don't Throw a One" - go on over and check it out.  The last date to enter the contest is May 15th, so I suggest you go over after that so as not to reduce my chances winning.

All kidding aside, it's a very generous give away from one of my favorite bloggers - go check it out.  I'll probably not hold you directly responsible if I don't win anything.  Probably.....


Saturday, May 9, 2015

Sectional Terrain: Mountains of Foam

Two more 2x2 foot sections have been started which are raised terrain.  The design goal is to build two mountain (Ok, hill) sections that when placed back to back create one large hill but when turned around can create a narrow pass for an ambush or choke-point style scenario.


 I used the Proxxon Thermocutter to bevel the 1 inch polystyrene foam at a 30 degree angle to form the mass of the hills.  30 degrees is as steep as one can go and still have a figure stand up on it.

 The second hill section.  the lower tier of the hill is 18 inches wide at the bottom  and the top tier is 12 inches wide.  Both are centered of their respective board edges so the match up.  There will be a little fiddling at the end bur they are good matches.  I'll cover the exposed pink foam on the ends with some 1/16 inch think polystyrene sheeting.

 Hill section #1 with some ground texture added. I also reduced the grade on about half of the sides with some plaster cloth and tile grout tinted with paint.  Being a little obsessive, i did add a narrow pathway up the top of the hill (on the left) so I can answer a players question on how did the artillery get up there.  By the way, that's a hint for the upcoming Historicon game!
Hill section #2 - if you compare the right edger of the photo above with the left edge of the last picture you can see where the hill match up.  Flip them around and there the narrow pass.

Once the tile grout sets (which has white glue mixed in for stability) I'll carve some cliff faces in and the next step will be scenicing.

I'm very pleased with how these two sections are shaping up.


Friday, May 8, 2015

Sectional Terrain: Rocky Depression Section

 A few "in-process" shots of the rocky "depression" terrain board.  The rock face has been dry brushed with 3 shades of progressively lighter grey.  The sandy area alongside the rocks has also been painted and I'm waiting for it to dry before applying the ground scenery.  There were some white spots poking through the brown  base paint and since I had the sand color out I used it to fill the gaps.
 A few close up shots of the rocks.  I may hit them with a final dry brush of white but I really like how they came out.  The rock face itself has lots of spaces the can hold figure bases about 1/2 the way so a player can put figure just poking over the top of the rocks or have them completely hidden down on the sand.
When making scenery like this it's important not to rush from one step to another - the Iraqi Sand* paint needs to dry completely before any static grass or ground foam is applied or I get some where I don't want it.  I've learned that it's best to do terrain in fairly large batches and actually lay out you production steps on a checklist.  Almost all of my terrain "disasters" have come when I've tried to rush things.

* Another tip is that is that while I really like Vallejo paints they aren't really cost effective to use for terrain.  I created some Paint sample cards of the colors I use for terrain Flat Brown, German Camo Orange (great for dry brushing) and Iraqi Sand and took them to my local hardware store and had some some 1 quart paint pails made up.  Now I've got plenty of terrain paint in a thick and very durable latex.


Wednesday, May 6, 2015

Sectional Terrain: Redone Feild

 After the heartbreaking diagnosis of "Vegetarian Measles", I sprang into action to "cure" my field board.  The first step was to move the offending clump foliage which was done with my trusty scrapper.  It was surprisingly hard to get the little buggers off the field and the plaster was damaged a bit.

 A new layer of "top-soil" was added using the sandstone colored  tile grout.  It will have more texture than the Durham's Water Putty.

 I discovered that using a cheap foam brush to make the furrows is a lot easier.  Before I had been using a old knife and it was hard to keep the furrows relatively straight but the foam glides over any hard spots and is a bit forgiving.  Let the brush dry after using and then clip off the ends with grout and it's good to go.


 The new crop-less field after painting. The paints still a bit wet.  I'll add some shading (a few drops of india ink in rubbing alcohol and some details along the sides - a fence section and a few rocks.  I think it already looks a lot better.

 There was also some progress on the rocky depression board - the base coat of brown and an initial great coat for the rocks.  Over the next several days I'll progressively add lighter grey dry brushes to bring out the details.
Ahhh, the first signs of Spring - peach buds on our peach tree's  Spring is a glorious time here on the Maryland Eastern Shore but it does bring more outside activities to compete with cellar dwelling modeling stuff.  Budgeting my time will become increasingly important if I'm going to be ready for Historicon.

This year's garden has been started.  The new crop to try this year are acorn squashes - we'll see how they do.


Sunday, May 3, 2015

Sectional Terrain: WTF? The Heartbreak of Vegetarian Measles!!!!!!

WTF - as in "What the Flock?"  I'm sure that's what you thought too...

I had a few hours free yesterday so decided to add some ground texture to my test sectional boards.  The first picture shows the materials that will be employed - a selection of ground covers from Woodland Scenics and Scenic Express.  An old kitchen strainer will be used to apply the materials.  The binding agent is some diluted white glue (50/50 mix with water).  Not pictured is another important tool - a spray bottle filled with water and a few drops of dishwashing soap.

I do need to make two very important points
(1) When in use store the dry components to one side of the project and the wet ones on the other - just trust me that this is a good idea.
(2) If my wife asks any of you if you've seen her missing strainer, you don't know nothing - capiche?

I've learned to work in layers when applying ground coverings.  I put down a think coat of the dilute white glue and then the static grass mixture via the strainer.  Once that's down I'll sprinkle a very light coating of ground foam to add some color variation.
Once all the ground cover is down, I spray the area with the water (the soap breaks the water's surface tension and helps it flow into all the crevices in the foam) and then hit it with some more diluted glue from an eye dropper.  The water helps convey the glue through all the materials.  While it takes a long time to dry (24+ hours), it will be rock hard and very durable.

A shot of the field board with all the material down.  The light colored streaks are where I put the glue down but these will spread and then disappear during the drying process.

Artistic disaster strikes!  While the field board was drying I got a bit bored and thought it would be really neat to add some crops to the field.  I took some clump foliage and broke it up into small chunks.  This is one of those ideas that seemed great when there were 6 of 7 "plants" down but the end result looks like my board has contracted a case of the "Vegetarian Measles".  It really looks awful.  Idle hands....

The field will need to be redone.  My apologies if this photo upset those of you who are sensitive to these kind of things...

A close up of the ground cover after 12 hours of drying.

I did choose NOT to apply my static grass with out the electric applicator that makes it stand up.  This was a choice where practicality won over appearances.  While the grass does look better standing up, it's far less durable and these boards will see a lot of transporting.

The next board will see a little terrain height variation - in this case the board will gently slope down from the left side and end in a exposed, slightly curved rock wall on the right (I still need to carve the rock face).  Depending on how the board is oriented it can be used either as a defensive position or a maneuver obstacle.

Why all the 1/2 inch thick pieces of extruded polystyrene?  Is my planning that intricate?  Nope, I was practicing cutting dimensions of scrap polystyrene 'cause I got a new toy:


A Proxxon Thermocutter - think band saw for polystyrene!  I got the idea from Anton's Wargame Blog and his fantastic fort project.

I purchased mine from Amazon Prime.  The list price was a bit higher but the free delivery made the total cost cheaper.  Now here the cool part - Amazon is testing same day delivery in my area (DC / Baltimore) so I ordered this beauty on a Tuesday morning and received it Tuesday evening.  All hail Jeff Bezos!!!

It's a really useful tool but I'm still figuring out how to use it effectively.

Edit: As I go along in this project, I'll keep adding to the list of "Stupid Terrain Maker Tricks" - here's the first:

(1) Ground foam crops look awful when they are both different sized and not spaced evenly enough - take the time to add details the right way and don't rush