The latest scientifical-type test undertaken here in the Lair are some urban hexes. The weather on the Chesapeake Bay has been horrible (thus creating hobby time) and I needed a break from secret project 12AZ36. This confluence of events created the perfect opportunity to start yet another project - Urban Terrain hexes.
One of my long term gaming goals is to bring the WW2 tactical board game "Old School Tactical" to the table top and I'll need some urban hexes. Old School Tactical is a hex and counter game that reminds me of the original Squad Leader - before it became pretentious with the "Advanced"superlative. I've been thinking about how to bring it to the tabletop and one of the first decisions is scale 15 or 6mm. I fired up the Prusa 3D printer and printed off a building ruin in 15mm scale (which was what the STL file was set too and then scaled it down to 40% to get to 6mm scale. The first picture shows the size difference - it's pretty dramatic and at 6mm I had room for 2 buildings per hex.
Here's a few close ups of the 15mm building. I printed it at my standard 0.2mm layers and it took 3.5 hours to print. There were a lot of strings going across the gaps (windows and doors) which would have taken a long time to clean up but I realized something - 3d printers melt the material to flow through the print head so what if I held the piece over a lighter? Presto 90% for the strings disappeared. The burning method works well for a ruin but may not work all that well for a piece that isn't supposed to look, well, ruined.
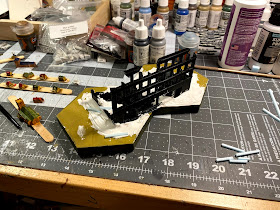
I glued 2 hexes together and then mounted the building on them - all with Eileen's Tacky Glue.
The base was masked with some flexible modeling paste (liquitex). One that sets I'll add some texture and other forms of rubble.
I can fit two versions of the same building on a single hex in 6mm. The one on the left is the same building as in 15mm and the one on the right has it's back wall still standing.
I printed both of these out using a 0.1mm layer setting and each took about an hour to print. They had the same issue of strings across the gaps but the "trial by fire" clean up method wouldn't work. How do I know? These models are prints 2 and 3. Print 1, ummm, melted. It took me about 45 minutes to clean up both models with a hobby knife.
For the 15mm test piece I was going to need a lot of scale bricks in the rubble so out came my trusty proxxon hot wire cutter. I set the width to just under 1/16th of an inch and made two passes to create 1/16th square "boards". It doesn't take a lot of EPS foam to make a bunch of these sticks.
In all honesty the bricks are a little over scale for 15mm but close enough for me.
Some of the sticks I set aside to use as boards and the majority I started cutting into by hand into bricks. This part is a little tedious but pretty easy. While doing so, one also gets a free lesson in the wonders and joys of static electricity. Our hobby never ceases to amaze me.
I'll be thinking up some suitable concoction to create a rubble mix. It will likely involve tile grout as the binding agent.


Looking very good. I think I prefer the bigger single building.
ReplyDeleteLooking good. The 15mm building will look great once it is in place, and you could possibly go to 3 or 4 hexes for larger variants.
ReplyDeleteAnd are those teany tiny buildings on the left?
Translating a board game to the table top needs a bit of thought - you don't want the playing pieces to be too fiddly - so I tend to agree with Norm and vote for 15mm. Cheers Greg
ReplyDeleteI'm going to be contrary- I think the 6mm will give you more flexibility.
ReplyDelete