Monday, April 11, 2022

Terrain Workshop Sorted (at least for now)


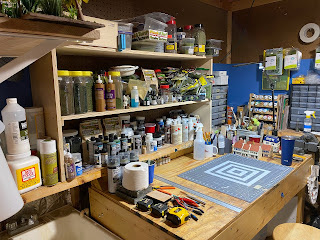
Well I've managed to clean out the Terrain Workshop.  Sadly, the bulk of the "debris" consisted of various shipping boxes that were retained for storage or to use in building terrain.  Of course neither of those objectives were fulfilled.


This space measure 8x8 and serves as both a terrain workbench and storage.  The big plus of this apce is it has a pair of doors which can be closed and hide the mess from the wife.  She has learned long ago that these doors are best left closed.


I've got the bulk and most commonly used scenery materials in a shelf unit right next to the work bench.


If we pan in a clockwise direction one can see 1 of 2 small parts bins - this one has small terrain items like various grass tufts, different grades of sand and special small detail parts.


Continuing our clockwise progression is a new paint rack for craft paints and the second small parts bin which is pretty much empty (for now)


In this corner, I store my unfinished hex terrain (just cut hexes in the boxes and my collection of 2x2 terrain panels.


Finally, another storage cabinet - the drawers hold my 6mm Russo-Japanese War collection and the plastic bins have 6mm ancients.  On top are my fully finished 4" hex terrain. 

Speaking of terrain making, I did decide to do a little work on the hex terrain - you knew that workbench couldn't stay that clean!


Wednesday, April 6, 2022

Hobby Space Reorg - Phase II


The Painting desk clean up is complete.  I added some paint racks that I got from Gamecraft Miniatures to organize my paints and try to keep them off the work space.  We'll see how long that lasts.


I also purchased a large small parts bin to organize my collection of basses.  I think its safe to say that I'm long bases.  During the clean up a large number of bases where discovered (re-discovered?) so my inventory of bases if rather large.  Those very nice people at Litko should be very happy with me.  I. ummm, have a lot of bases to work through.  Some people have a lead mountain, I've got a wood one.


Next up will be organizing the workshop area I use for terrain making and storage.  If my painting desk was described as a "disaster" the only word for this space is catastrophe! 


Sunday, March 27, 2022

Hobby Space Re-Organization


My Hobby area has become an organizational disaster - this is how it looks AFTER a massive clean up.  It's just not as functional and tidy as it should be and I find my work space shrinking every month or so to a 6 inch x 6 inch spot in the center as debris piles up.


I originally has this bench custom built at least 5 years ago and it's been really good hobby "investment" but it could be more functional.  On each side are some cubbies that I thought would be useful for holding small parts and tools.  Unfortunately, they functional more like a graveyard where stuff falls in never to be seen again.


Heres the left side - I have no idea what the cubbies are stuffed with but at least I keep the TY remotes on top and accessible.  
The right side set of cubbies are just over-stuffed and essentially are inaccessible.  


I'm going to build some shelve units to sit on top the cubbies and provide some more platform space - on the right side of the picture you can see on of the tier paint rack systems I'm going to place on top of the shelves.


I cleaned out the cubbies and piles all of that crap onto the bench top and installed the shelf extensions.  The shel units are just 1/2 birch plywood cut in a 24x9 inch size.  They're held in place by blocks of wood the are friction fit into the cubbies and then the plywood is screwed on.  This makes them very secure but easily moveable to be reconfigured.  Once I figure out the setup, I'll stain the shelves to match the chestnut coloring of the bench frame.

I now need to sort through the mess of stuff that has accumulated over the years.  There's just so much "stuff"...

I do realize that it's been a very long time since I've updated this blog.  I decided to take a little break from blogging as it was becoming more of a chore than fun.  I may transition Lair of the Uber Geek away from blogger (as Google seems to be uninterested in really supporting the tool) and over to another platform but haven't made any decisions on that.  


Tuesday, August 17, 2021

New Family Member: Impawator Augustus


Things have been a little quite on the blog lately, but not that quite in real life.  We’ve added a new member to our household - a puppy who has been named Augustus.  Now this is pretty big news as I’ve been asking for a dog since my lovely wife and I got married.  I was very surprised to find that on our 34th anniversary she finally agreed to add a dog to the family mix - Best anniversary present EVER!


Augustus is 11 weeks old and is a Lagatto Romagnolo - an Italian water dog which are used to hunt for truffles.  He is a wonderful addition to the family!


Here you can see Augustus advising me on strategy as I get ready to play a game of Blucher online against Alex from the Storm of Steel You Tube channel.  Augustus proved to be a canny strategist and is a very good boy, indeed.

Monday, July 19, 2021

Garden Fun


The garden is doing really well this year - heres a picture of what we pulled out of it on Saturday - and this picture doesn't have the peppers

Lots of tomatoes - there have been rumors that I may have planted too many tomatoes - as if that is even possible.  We do have 8 different types of Tomatoes this year.  My favorites are the Roma's (the oval shaped ones) which are used primarily to make sauce.
Speaking of sauce, the less than perfect tomatoes - ones that have split due to the heat or have some insect damage get cleaned up and then put through a food mill to make sauce.  The pitcher holds 3 quarts and we managed to get a total of 6 quarts of tomato sauce.  My wife then takes the sauce and turns it into marinara sauce which we freeze and use the rest of the year.  We got 2/3 of a gallon today of that red gold.

The garden looks like a bit of a jungle but is doing really well.  It makes my wife really happy and after her year of dealing with COVID she gets what shes wants.


I promise to have some miniatures content in a future post

Thursday, July 1, 2021

Shameless Self-Promotion: Austerlitz Game Video Trailer


Please take a look at the Austerlitz game video trailer.  The full game video drops on July 20th.


This game was one of my favorite Little Wars TV projects to work on and we used a slightly revised version of Dave Brown’s General D’Armee rules.  The terrain was built by fellow club member Ed and is superb.


Now this game was played with a twist - two different outcomes and viewers can choose which one they prefer.  It was a super fun game that I am really looking forward to replaying at the club one day.  There was also some surprises for both sides that are best not to be revealed here.


We used my French and Greg’s Austrians and Russians for the game.  

Sunday, June 27, 2021

3D Resin Printing: USS Minnesota


Some more experimentation with 3D printing - in this case a 1/600 scale model of the USS Minnesota from the ACW.


I purchased the stl files from a designer on the Wargaming 3D marketplace called East Coast Ironclads.  He has a large range of ACW ships to choose from and of the two I've purchased I have been very impressed.


The spars on the masts can be a bit delicate so I plan on reinforcing them with some green stuff sculpted to look like furled sails.  Off course if they break due to gameplay one can always just print off a new one!


I've got some pretty large gaps in my ACW ironclad collection and these models are a great way to fill them without spending a ton of money.

Tuesday, June 22, 2021

3D Resin Printing Week 2: Printed Terrain Details

Week 2 of my foray into 3D resin printing continues to show real promise.  Despite the the build volume being small (3.1 inches wide, 5 inches long and 6 inches high), one can cram a good bit on the plate.  One of the terrain features I was missing for the Stalingrad table was the Barmaley Fountain and I was struggling to scratch build one.  Let's just say there have been 2 scratch build failures.

A quick internet search found that 3dPrintterrain makes a collection of WW2 themed files which includes the fountain as well as some other iconic terrain pieces.  

It took a little maneuvering to get the fountain to fit on the build plate but it printed out great.  It's also far superior to anything I would have scratch built do I am really pleased.

I doubt I'll be printing out full building using the resin printer (expect for 6mm) but key detail parts like window frames, doors and signage will be easy to do and add a lot of visual appeal to my scratch builds.


One other useful "discovery" are these cheap plastic cafeteria trays.  The raise lips are great for keeping your printer in and protecting against the inevitable resin spills.  They also make great spots for storing works in progress.

The lips have edges that are 1/8 inch thick and about 3/8 of an inch wide.  I think I can build some really simple cabinet boxes with 1/8 inch grooves and make some super quick storage shelves.

I purchased 2 sets of 12 each, which cost me 20.00 each set (used).  Thats kind of expensive for plastic but compared to the alternative cost of wood and build time a real bargain.

Obviously, "cafeteria tray" storage shelves will not look as nice as my standard box shelves but after building 36 of these wooden shelves, I'm running out of space!  Plus with wood prices being what they are, it's hard to justify the cost.  Yes, all 36 drawers are filled just like the one pictured.


Sunday, June 13, 2021

Great 3D resin Printing Post on No Dice, No Glory

 There is a great article on 3D Resin printing for Historical gamers over on the No Dice No Glory blog.  You can find it HERE


I’m referencing the blog post as it’s likely a better write-up than I can do and the use the same printer I got for Fathers Day.  It also has some great links for historically themed 3D print files and I’m using the blog as a form of a notebook.


Saturday, June 12, 2021

First 3D Resin Prints

The Elegoo Mars Pro 2 printer has been set up in a temporary location (the card table in the game room) so I could start to learn how to use it.  Long term, I'll make some room in the shop.


The first miniature prints are a German Bison Assault gun and 2 Soviet winter infantry figures, all 15mm scale.  This picture shows the lot on the curing turn table right after finishing the ultra violet curing.  


I downloaded some all of these files from a sire called Wargaming 3D, which is a market place for vendors to sell .stl files for historical wargaming - if you're thinking about a 3D resin printer go check it out as the selection is very, very broad.

The second test print was a SU-76 and seven Soviet Naval Infantry figures (again, all 15mm).  The SU-76 is a 2 -part model - the hulls is one piece and the gun compartment a second.
I did have a minor issue with the back right corner of the gun compartment lifting off, as you can see in this picture.  It will be easy to fix with a little green stuff and maybe some stowage.
The corner lift continues around on this side.  In all honesty Ive had much worse issues with resin cast tanks from Battlefront.  I still need to remove some of the print supports from the model.
A close up of the "warping".  I'll be printing a bunch of SU-76's so will eventually figure out the right settings.  I really shouldn't complain - the .STL files for the SU-76 were available for FREE from the wargaming 3D site.  Free is a very good price.

A close up for the Soviet Naval infantry.  I am very pleased with the detail and think these figures are as good as the plastic or metal figures I'm used to purchasing for this scale.  In fact, I'd say they are better than Plastic Soldier Company.  These figures are from a file set called RKKA_naval_squad_02 which has 12 different poses and you get files for both 28mm and 15 figures.  There are also squads 01 & 03 from the same designer (mr3DPrint).  My current set of Soviet Naval Infantry are metal casts from Peter Pig - they are great figures but only have SMG's and 2 or 3 poses.  I'm very excited about the modeling possibilities here.

The Su-76 and 7 infantry figures took about 1.5 hours to print and another 15-20 minutes post production to wash and cure.  The build plate on the Mars 2 Pro isn't that large and I could probably fit another 3 infantry figures on it.

I am very struck by the reliability of resin printing.  One does have to be very thoughtful in working with the resin - its rather toxic stuff.  The key is developing a set workflow to ensure you don't contaminate surfaces with resin that gets on your gloves.  I'll do a future post on my workflow once I feel its really nailed down.

3d Resin printing is a really exciting technology for the hobby and I think it will have a profound impact on the distribution of miniatures.  Will it replace cast metal of plastic figures - probably not.  I think it will eventually reduce the sizes of those "mass produced" ranges to the basics and push the specialty troops to digital distribution.  I'll probably always get my bog standard Soviet infantry from Battlefront or PSC, but specialty troops like Naval Infantry or NKVD will likely now just be purchased as files.