Sunday, December 29, 2013

The Cabinets are Assembled

On Friday, my son Sean and I finished setting up the new cabinets we picked up at IKEA.  All-in-all, they were very east to see up and can store a large number of figures.  I've got my Napoleonics, War of 1812, American Civil War and Romans/Dacians all store in the cabinets.  There's also some room for 28mm WW2 and Sean's robotics trophies.

We will be getting a few extra shelves as there's more to put up but I'm very pleased with this addition to the game room.


Friday, December 27, 2013

Game Room MakeOver Update

My son and I ventured off to IKEA yesterday with the goal of finding some display cases to help organize the game room.  Now don't laugh, but this was my first excursion into "Kingdom of IKEA" and I found it to be a fascinating experience.

In terms of a plan or objectives, we really didn't have one ' cause we don't roll like that.  We did have some vague guidance from my lovely and scary wife that whatever we bought "better look good" and either be white or a light shade of wood.  Many a man's hopes and dreams have been dashed by similarly vague spousal guidance, but it wasn't my place to question orders.

I did want to get something that would allow me to display my painted miniatures and get easy access to them.  Right now they're stuffed inside of stackable plastic boxes, which while utilitarian, doesn't have a lot of visual appeal and takes up valuable terrain storage space.

After wandering around the store goofing off for an hour or so we settled on the Billy bookcases pictured above.  They come with optional glass doors.  The pricing is very reasonable with a 30" wide by 80" tall bookcase costing $60.00 plus $90.00 for the optional glass doors.  We ended up getting 2 of the 30' wide units with glass doors and 2 smaller (11" wide) versions with out glass doors.  Each of the four units has 5 shelves plus the top and total storage is 4,000 square inches plus another 800 square inches along the tops.

One word of caution, IKEA staff are a little sensitive to the whole "horse meat in the meatballs" story line and sometimes don't see the pure comic genius of references to said incident.  Apparently, asking the server in the IKEA cafe if the meatballs are made with grain fed or free range horses isn't appreciated.

Despite some cold reactions in the cafe, we did manage to pick out or stuff in the warehouse and check out.  One downside of IKEA stuff is, since it's made of press board, it's on the heavy side.  I was very appreciative that my son was around to show off how much stronger he was than the old man.  I was able to goad him into to showing me how strong he was by unloading all of the units by himself.  Finally a return on all those groceries he's consumed...

I'm a little over 75% done with assembly and it's been a lot easier than I thought.  The doors are a snap to attach and actually look really nice.  I may add some puck lighting and replace the wooden shelves with glass at a later date.  Glass shelves from IKEA run $10.00 apiece.

Sadly, my collection exceeds the allotted space but we can add more storage once the Mrs sign's off on our initial setup.  I have done a little estimating and the units will hold my Napoleonic, War of 1812, American Civil War, Roman & Dacian armies.  The smaller shelves in the 11" wide bookcases will hold my Saga and Bolt Action skirmish armies along with the 15mm Flames of War stuff.  Sean's Robotics trophies will go across the top.

The other big plus is that I'll be freeing up a lot of storage space for terrain and such after I get the troops in their shiny new barracks.

Tuesday, December 24, 2013

Sci Fi Game at Ernies


 Last night I got to over to Ernie's house (AKA World Wide Headquarters for Architects of War) to play a game.  Ernie put on his usual fantastic game - take a look at the table!.  The games theme was a post-apocolyptic setting where each player controlled an 11 figure "gang".  The setting was very "Fallout" like and we were playing 2 games where the outcome of the first influenced the second.

 2 of the 5 gangs started out near the old motel complex.  Each gang had a secret objective.  I had a gang of mercenaries and my objective was…money!

 Here's my gang entering the middle of the board. the first game had all five gangs wandering around the table looking for artifacts and dealing with both other ganges and monsters who would spring up from time to time - it was great fun!
 The techno guys (I forgot the whole name) get surprised by a menacing eye stalk monster in the mountain pass…


 My guys get their first loot at an abandoned car as we pick our way through the scrub.

 Damn lizard mutants are harassing my flank

 Irradiated mutants spring an ambush in a convenience store.
 AHHHHH a real world bug!
 Very life like


 The next scenario had the survivors of the first trying to repeal and attack by a large gang that had robots of mutant Ogres!

 After a particurlay bloody exchange Ernie felt he needed to make some scenery adjustments.


 Oh the carnage….


Post game conversation.  Trust me we are weighing very deep thought here.

All in all it was a fantastic game and a whole lot of fun.  Ernie seems to have a never ending supply of miniatures and rules systems.  It was a very fun outing.

Thanks Ernie!

Sunday, December 22, 2013

Merry Christmas from the Lair of the Uber

Merry Christmas to one and all for the Uber Geek!

I hope you and your families have a wonderful holiday and a Happy New Year.

Here in St Michaels, preparations for the big day are reaching a feverish pace and the safest place for me is at my painting workbench!


Tuesday, December 17, 2013

28MM Perry Union Artillery Crew & Guns, Painting Challenge 4, Entry 1

 Here are some pictures of my first entry in this year's Analogue Hobbies Painting Challenge  a 28mm scale Union Artillery Crew and guns.  All of the models are from the Perry's.  As has been pointed out to me by others, "one really can't go wrong with the Perry's"

 I did paint up one of the figures with a slight holiday theme - lets see a red shirt and white hair and beard - hmm what could that be for...
 Next up will be a 24 figure confederate infantry regiment using the Perry plastics.  The regiment will be from Hood's Texas brigade (I'm not sure which regiment yet).


Sunday, December 15, 2013

The Challenge Begins!

I've completed my first submission for the challenge - a four figure Union artillery crew and two gun (one rifle, one Napoleon 12 lbr).  The figures are 28mm Perry metals.  I think that nets me a whopping 40 points out of my 1,500 point goal!

All journeys must begin with a single step!

I'll post some pictures once Curt gets them up on his site


Sunday, December 8, 2013

Fire & Fury Regimental: Tunnel Hill

 Last night I had the opportunity to play in a ACW game using the Fire & Fury Regimental ruleset.  Unlike most games, where players often have to ponder the authors intent from just the text, we were not so handicapped since the game was put on by the author himself, Rich H.!  We were re-fighting the battle of Tunnel Hill, which was fought on Nov 25, 1863.  The battle consists of a Union Assault on entrenched Confederates atop a hill.  The first photo shows the initial confederate positions.  I commanded the extreme left flank of the CSA.

 As with all my battle reports, I forgot to take a lot of pictures - this photo shows a Union assault on the Hill.  The CSA had a rough time with this game given the accuracy of the Union off-board artillery but the game was a lot of fun to play.

 As for the rules, I really like Fire and Fury, Regimental.  They have a very good feel for the period and players need to really think about when to time charges vs standing back and trying to wear units down with fire.  I also like the movement mechanisms which reflect the difficulty of moving units in line formations.  The game also has command friction which becomes more evident as units wear down and tire - I really like that in a game.  All-in-all it's a great ruleset but requires a game to really understand how to play. Highly recommended.

 We played with 15mm figures, which were nicely painted.  15MM gives an almost panoramic feel to the game and allows a relatively large battle to be played in a reasonable amount of space and time.

All in all it was a great evening and I was very grateful for the opportunity.

Sunday, December 1, 2013

Destroyed Vehicle Markers

 With my re-engagement with Flames of War (FOW) and the upcoming release of All Quiet on the Martian Front (AQMF), I decided I needed to spruce up my gaming accessories.  I saw these Sentinel Miniatures destroyed vehicle markers reviewed on the WWPD site a good while ago and I bought some but never used them.  They look really nice so I decided to paint them up.  I purchased 4 packs of 5, so lets see carry the 2 -ummm, yes that means there are 20 of them.

Painting them up was a very simple process
Step 1: Flat black primer (I used an auto primer)
Step 2: Dab on red paint sparingly along the bottom third of the smoke column
Step 3: Dry brush orange and then yellow over the bottom third of the marker
Step 4: Dry brush a medium gray over the top two thirds.

I think they look really good and given my poor playing skills, I'll need a lot of them.  They will look especially good with the AQMF game

Saturday, November 30, 2013

Comparison Shots of Type 92 Tankette

 I was asked to post some scale shots of the 3D printed Type 92 Tankettes and some of my other 28mm stuff.  First up, a few pictures next to three 28mm infantry figs (from left to right 2 Battle Honors figs and a plastic Warlod figure)

 Another view.

 Here's a close up with the plastic figure on the right.

Lastly, a comparison shot with a 1/56th scale Chi-Ha tank from Company B.  I think Nate hit the scale right on as these little vehicles look to be in scale

Prep Work for the Challenge has Begins!

Just like the 60 other participants in this years Analogue Hobbies Painting Challenge, I have been focusing my hobby time on prep-work ahead of the Dec 15th start date.

First up for priming is a rather ecletic tray of 28mm stuff.  Starting in the upper left and moving clockwise are
- 13 French & Indian War Figs I'm doing for my Bloggers for Charity Contribution
- 30 Perry Dismounted Cavalry (18 Confederate and 12 Union)
- 3 Blitzkrieg Models tanks (Panzer III J, Matilda 2 and a Grant
- A Core Sec Engineering Higgins Boat
- Yet another Perry Confederate Infantry Regiment (24 figs)

My goal is 1,500 points this year.  The tray above will tally in at around 425 points (assuming his most honorable and munificent lordship Curt allows me a few extra points for the Higgins boat given its size).

One of the things I like most about the challenge is that it provides a reason to go in and mine some of the lead and plastic I've accumulated over the years in this hobby.   I'll pause here for a moment as I know it's a shocking revelation that a gamer has a stash of unpainted miniatures….

OK everyone settled down now, good, lets proceed…

The competition is a great opportunity to delve into the lead mountain to paint up stuff that's accumulated.  For me it will be 15mm Flames of War stuff as I'm starting to get back into the game thanks to a very fun outing with WWPD Luke at the Flames of War doubles tournament at Fall-In.

Enough talk, back to priming

Friday, November 29, 2013

3D Printed Japanese Type 92 Tankettes Completed

 I manage to finish painting up the two Type 92 Tankettes I received from Nate.  These models are 28mm scale and were designed by Nate via on the computer and then 3D printed.  I must say that they were a joy to paint and I'm a big believer that this technology will have a big impact on our hobby.

 A close up of one tank - you can see the layering effect caused by the printing process on flat surfaces, such as the turret side.  It's invisible anywhere there is detail - the engine grill vent in the back.  I think the effect looks great.  I'm not sure what material Nate used (there are lots of options) but it holds up well.  The only issue is the long heavy machine gun barrel droops a bit but that can be easily fixed with a bit of thin brass rod.

 The second tank looks that same but I needed to replace the medium machine gun in the turret with some brass rod.  Remember these are just Tankettes (a little more than two inches long) so there very small.  The tanks are perfectly scaled in 28mm but have roughly the same physical size as a 15mm Sherman tank.

 The brittleness of the material is about the same as a resin model.

Overall, I'm am very happy with how they came out.  You can follow more 3D printing adventures over on the WWPD forum here.

Thursday, November 28, 2013

Happy Thanksgiving from the Uber Geek

Just a short note from the Lair wishing all of you and your families a happy Thanksgiving Day.

Here in the Lair, it's the quiet period before the storm of preparation begins.  I think I find the frantic preparation of the feast as much fun (maybe even a bit more fun) than the actual eating itself.

My wife prepares a legendary meal and what may be even more myth-building is the kitchen mess she can create.  At times, I think she secretly takes handfuls of flour and just throws it in the air.  Of course, there will be the inevitable Thanksgiving Day challenges to be faced - the panic of a missing ingredient, a dropped pan (ahhh, the year of the para-turkey!), a spilled glass of wine - all things that will be overcome and transform from crisis to cherished memory.

But the main theme of the day is to be Thankful for what we have and I find my self with an overflowing cup there.  We're all healthy and, with my son is home from college, we're all together so what can be better than that?

Have a great day, enjoy the football and be thankful for what you have.

Wednesday, November 27, 2013

4Ground Ruined House #2: Let's Play Dress Up

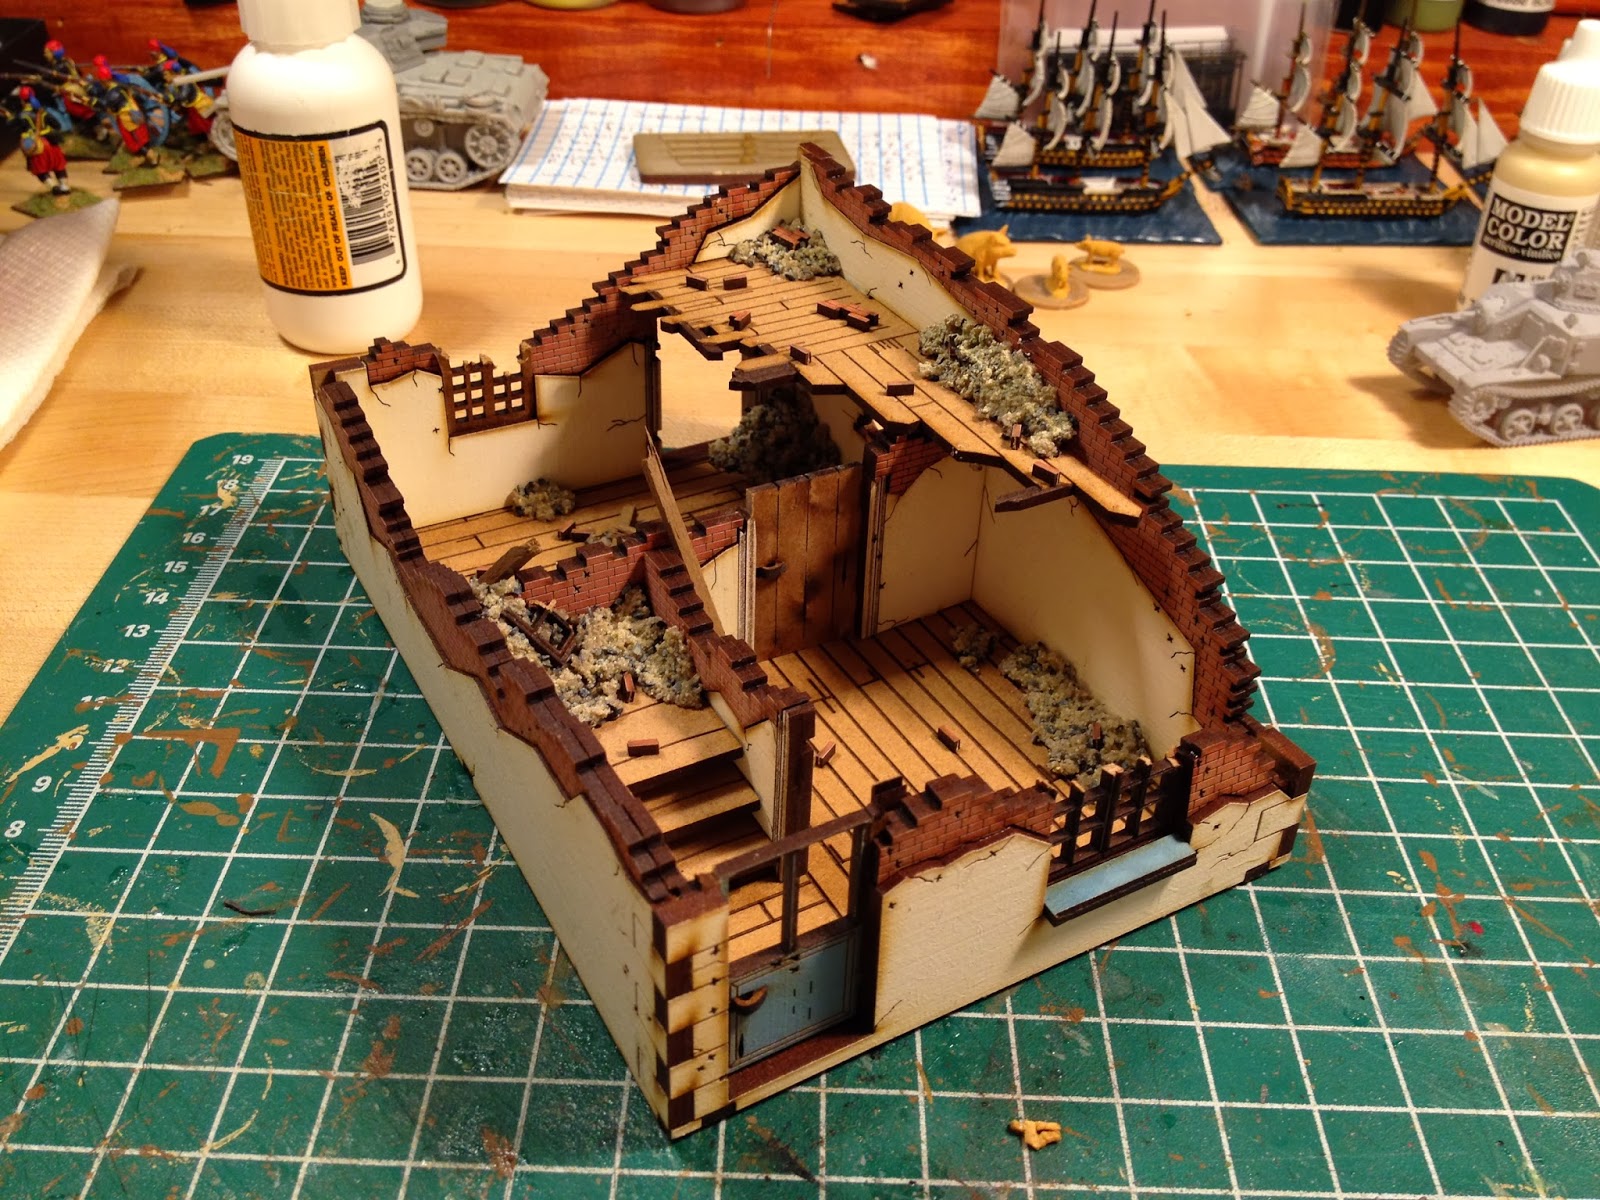
The first picture shows a finished model of the 4Ground Ruined Hose #2 kit.  It's a great kit but, to me, it's looks both too angular and clean - every things a right angle and there is no rubble.  I wanted to take a stab at "tarting-up" the model by adding some simple details.  I also need to keep the additions limited so there's still room in the structure to place figures.

Here are the limited materials I used
- a slurry of playground sand, model railroad ballast and matte medium for rubble
- Some basswood for timbers - painted with Vallejo Biege Brown (874) which matches the floor boards closely
- The precut brick rubble provided with the kit

 And "viola", a dressed up version of the structure.  I went with a restrained application of the rubble and then dry brushed it beige to match the color of the "plaster" covering the walls.  I also interested brick sections and window frame parts to add to the effect.  The slurry dries rock hard after 30 minutes and once that happens it really isn't going to move.

 A handful of timbers were added for more visual interest but I tried to keep them out of the way so figures can still fit in the model.

One last shot.  This project was both simple and fast.  I think I spent 30 minutes putting everything on and cleaning up but the result is acceptable.

Note: my post can also be found on the WWPD Bolt Action site