Monday, November 30, 2015

Some Fire and Fury Gaming: AWI Style

I was very fortunate to be invited over to Rich H's house to play a game of Fire and Fury Regimental: set in the American War of Independence.  Rich is the author of the Fire and Fury ruleset which are the best rules to use for black powder gaming (IMHO).  Rich also hosts a wonderful day of gaming, repeat with a superb table and wonderfully painted mini's and food - what's not to love?

The battle I participated in was a recreation of Guilford Courthouse.  I had command of the British left flank and our objective was to batter our way through 3 successive lines of American troops.  The first two line are "raw" militia while the third American line is a mixture of good to very good Continental regulars.

 The British force is small by comparison, but made up of either Elite or Veteran troops.  The figures are 15mm in scale and are from Rich's friend's Tony's collection.

 It wasn't very hard to clear the first line of militia and soon we were advancing on the second line which was now reinforced by remnants of the 1st line.

 The Brits's attempt to envelope the American line with my troops on the left and Tarleton's cavalry and Hessians on the right
 Success! both flanks collapse due to some astonishingly bad die rolls on the US side.  My US opponent for the day, Dave, was a great sport and took the ill favor of the dice Gods in stride.
 We continue chasing the fleeing militia and also started to set up for the main assault.  The third line of US troops are held in reserve (can't move) until the Brits cross the fence line in the middle of the picture.
The Militia try to stem the tide but just can't stay rallied..
The disparity of losses heavily favored the Brits - our losses are in the lower left while the US losses are everything else.
 The final assault commences!  Sadly, I had to leave at this point for a prior commitment and I ceded my command to the other British player.  It was a grand game.

 Rich was actually running two games that day, with the second being a massive recreation of the second day at Shiloh (ASW).

The pictures really don't so the game justice as there were huge formations of troops pitted against each other.  It seemed to be a bad day for the Union during this game.

What a fantastic day of gaming.  I really enjoy the fire and fury rule system, especially the command and maneuver rules.  If you're looking for a new ruleset to play the ACW or earlier black powder time periods you should pick up a copy.  Look I even put link to the rules description to save you time: Fire and Fury Regimental Rules

Come on, you know you want to buy the rules and with Christmas so close I think you owe it to yourself.  It's the right thing to do....


Sunday, November 22, 2015

Tournament Transport Boxes, Part IV: The Interior

 A little bit of work on the 18x18 square box.  I added a compartment for to hold dice, measuring tapes and templates.   It measure 8x7inches so is more than big enough to hold a 6 inch square FOW artillery template.

 I also made some wooden troop carrier trays that are all two inches high which will accommodate most 28's and 15's with the exception of some long lances on some 15MM By Fire and Sword mini's but I'll figure out how to accommodate those later.

Some of you might be wondering why make custom wooden trays when you've got some plastic ones already.  It's because I was off an 1/8 of inch and the interior was too narrow to use then without forcing the fit.  Argh!!!!!!

What was that saying "measure once, go to Home Depot twice and curse three times"?

A shot of the trays all nestled in the box.  Theres still one inch of clearance on the top and the gap will fit a FOW hardcover book.

Still waiting on the handles to arrive and then it's time to finish this project.  Which is good because the Analogue Hobbies Painting Challenge is less than a month away!!!!


Wednesday, November 18, 2015

French Reinforcements Arrive!

 When opportunity knocks, it's best to open the door!  John over of Wargaming in 28mm fame, has decided to parts ways with his French 28mm Napoleonics and has been selling bits and pieces off to finance a big move into 18mm Napoleonics.

He made me an offer I couldn't refuse on his Front Rank French collection and they have just arrived.  Please forgive the awful pictures as they just don't do his superb painting skills any justice.  I also need to reattach the unit flags and such but these are fantastic figures.
 4 units of French calvary, including Lancers! (The Lances need to be re-attached)
 7 battalions of infantry and 4 gun batteries plus 2 limber teams.


Some officers to command this rambunctious group of Frenchmen.

All of the figures are from Front Rank. It's my first real experience with Front Rank figures and I must say I am impressed.  Maybe I need to relax my Perry snobbery a bit.

I tend to run bigger battalions and so will be getting some front rank figures to "flesh out the ranks"

Thanks John, these troops are a welcome addition to my humble collection.

Monday, November 16, 2015

Tournament Transport Box, Part 3: Main Construction Done and a Dice Tower from the Scrap!

 Sunday morning I was determined to finish up the construction of the tournament boxes.  The next step involved  adding rabbets to the sides of the boxes s to accept 1/2 plywood that would be used for the bottoms.

Using a rabbet mean the interior height of the box will go from 5.5 inches to 5.0, but that still allows for stacking three troops trays (at 1.5 inches each).

After that was done, the next step was to fire up the 'Ole Table Saw and cut the plywood to fit.  I had a 4x4 foot price of 1/2 plywood in the shop and used it for the bottoms.

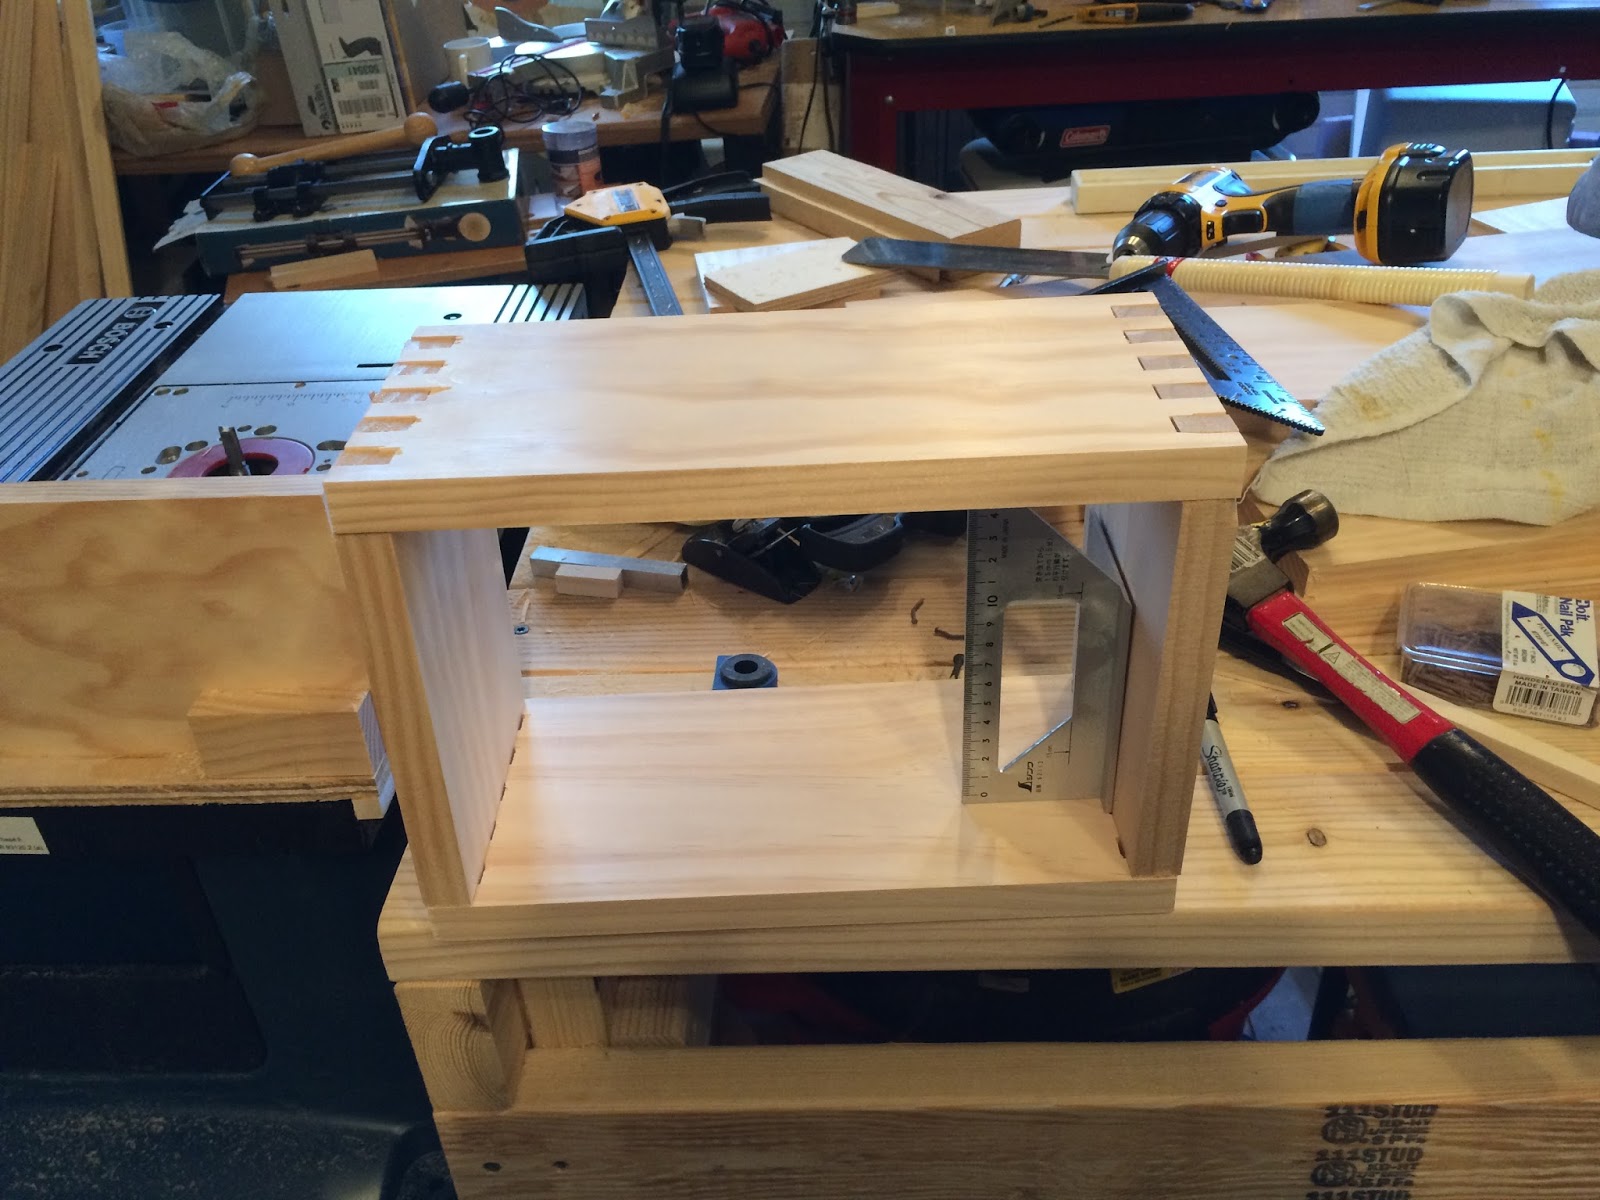
Everything fit really nice as you can see from the dry fit in the fist photo.  When building something with precise corners always dry fit each piece as you go.
 The next step involved glueing the bottoms to the rabbet slots.


 I also added a few brad nails to hold every thing in place.  The wood glue plus the brad nails means the bond will be stronger than the wood.  The wood will split before the glue bond breaks.  Thats important because it wouldn't be a good outcome if the bottom fell out while I was carrying a bunch of troops.
 All nice and square.  I did sustain a minor shop injury doing something stupid....  Handling rough wood without wearing gloves which resulted in a 1inch long splinter.
With the boxes done, it was time to move onto the the tops.  The tops will be cut to the exact dimension of each box (18x18 or 18 x 24) and  will have a lip around them to fit sung to the box.

You can see I suck at miter cuts and had to add a little extra to make one corner "fit".  I'll be able to hide the gaps when finishing but it's something I need to learn do a better job with.

The framing is just stock 1/1/8 corner molding.  It makes a tight fit the box top and will serve as a nice frame for the sceniced top.

 Here are the boxes all nice and done - at least construction wise.  They still need to be sanded and finished and there will be some interior work also.

I did order some "aged brass" clamshell handles from Rockler which should arrive in a few days.

 On a whim. I decided to use the remaining plywood from the 4x4 piece of plywood to make a dice tower.  This is one of those projects that has zero planning so we'll see what happens.

The dice "motivators" are glued in place.  I'm sure their is a more technical name for these in the the world of dice tower science but I haven't bothered to look it up.
 The sides and bottom are attached.  I still need to cut a 45 degree ramp at the bottom to make sure the dice flow out of the tower.
 Another shot of the boxes.  I'm pleased how they are shaping up.
 The basic dice tower.   I'll add some details around it to make it look like a castle.
A look down the business end of the dice tower - I suppose this will work.


Lastly, I did come up with a use for the first test box - it will serve a a tool caddy onto the workbench.  I'm constantly looking track of measuring tapes, pencils etc in my workshop.  I suspect it's gremlins moving that stuff around.

Having a caddy to put small frequently used stuff in and keep it with reach may reduce the time lost to looking for that #&%@ pencil.  I will drill some 3/8 inch holes down one of the long sides to hold screw drivers and pencils.


Sunday, November 15, 2015

Tournament Transport Box Part 2: Getting the Cuts Right

I re-jigged the jig to try and make it work a bit better and as you can see the 18 inch square box came out very nicely.

 The first test (pictured) had some some tear out issues and the fingers were not fitting together perfectly.  Stuff likes this drives me a bit crazy.  I suspect there's a not to complementary psychological term for that but lets not get off track....

At first I thought it was the router bit (yep I went first to blaming the tool rather than the tool user).  It wasn't the bit.  I finally figured out that I wasn't clamping my pieces sufficiently and the turning of the router bit was pulling the wood to the right  causing a drift in the cuts and the unsightly tear out.

I made another part for the jig which holds the pieces vertically so theres no wiggle.  It can be used for either type of cut (one were there's a tooth first or the other were theres a gap).

I just clamp this guy into place and everything stays nice and square.

The next step will be to cut a rabbet for the bottom (1/4 inch plywood) and do the frame for the top.  Still trying to figure out how to attach the top...

Saturday, November 14, 2015

Torunament Transport Box Part 1: The Jig

 Not the dancing kind of of Jig but the workshop kind.  Yes I know a lot of you are very disappointed not to see video of me tripping the light fantastic but such images have been known to crash the internet.

As I mentioned in the last post I want to use finger joints on the tournament box edges.  It can be tedious chisel out individual notches so a quick way is to build a simple jig for 1/2 wide finger joints.  I started with some scrap plywood  and 1/2 square wood.
 The first step is to make the right side rail guid which will hold the jig along the right side of the router table.

A little glue, some clamps and it's attached.

 The other parts - all cut and ready to go.  The two narrow strips of plywood are 3/8 square and will be glued together to be used as the left side channel guide.  With the two guides in place the jig can only move forwards and backward - no side to side movement.
 The wood is cut for the two boxes I am making.  I decided to make one box 24 x18 inches and the other 18 x 18 inches just to see which size works best.

 The front and back plates are attached.  The wood in-between is just used for spacing.
The initial grove is cut using a 1/2 inch straight bit in the router.  I'm using some scrap wood and a metal spacer to help me place to positioning guide tooth.  It's a simple design - place the stock you want to cut next to the tooth and slide the jig into the router.  The next step is to lift out the piece and set the newly cut notch on the tooth and then cut the next one and so on.

 The top corners of the tooth are chamfered to make positioning easier.

 The first notch is cut!
My first test box.  It took 10 minutes to cut all the notches and they fit well.

I'll probably end us using the box as a nice shelf for mini's once I clean up the tear outs and finish the wood.

 I need a new bit as you can see some tear out
 A little bit of labeling so I know the size notch that the jig will help cut
It took me about 2 hours to make the jig (there were some mistakes that I've omitted).  It will be a very handy item to have in the workshop.

Who's this?  Some friends in Annapolis just got a new puppy, Otis.  I'm not sure what type of dog he is but he's not a poodle (which is good).

I'm trying to convince the wife to get a dog and may borrow this little guy for the marketing efforts.

Wednesday, November 11, 2015

Tournament Transport Box

I really like playing in tournaments - it's a great way to really learn a game system and have a lot of fun doing so.  One thing I don't like is my current mode of troop transport which consist of lots of 14 5/8" x 10 1/4" x 3 3/8" plastic boxes from "Really Useful Boxes".  These are great from a storage and use around the house viewpoint but not all that handy in moving about to a tournament.  I also don't have a display tray which some people use to move the troops from table to table during a tournament.

So since I have this new cabinet making workbench and some shiny new power tools (the old ones just didn't fit with the new workbench - at least that's what I told the Mrs), I think this is a good project for this weekend.  I have devised a radical new way of thinking for a project like this - rather than start cutting wood, I should come up with a detailed plan and some capabilities for the box.  By the way, this is were you come in via the comment box.  I'm not all that bright and will rely on "crowd-sourcing" for concept ideas.  Oh yeah, it feels good to be trendy!

Size:
I'm thinking a box that has the following dimensions 18 inches x 18 inches x 5.5 inches high will provide more than enough room to hold troops and rule books.  An 18" square may be a bit awkward to carry around so we'll need a good set of handles.  If I use standard 1x6 stock lumber for the frame, which is 5.5 inches high and .75 inches wide, the case will have an interior open space dimension of 16.5 inches square which is enough to fit up to 6 battle foam and/or Dave's Baggage train trays.

Removable Top:
I'd like the top to be removable to be used as a transport tray from table to table.  I'm also planning on making multiple tops so that they can be scenic in different ways.  It would just be gauche to show up to a desert themed tournament with a Northern European themed scenic top.  If we're going to do this, lets do it right.

I still need to figure out a way to securely fix the top to the box for transport but I don't want the latch to be visible.  I'm thinking velcro may be may best friend here

Joinery:
I'd like the box to really look nice and so want to do some fancy joinery work.  I'm leaning towards finger Joints (pictured below) as they look nice and are relatively easy to do on a router table.  Finger joints really "pop" if your using two types of wood

Another option is a keyed miter joint which despite having less "cutting" is harder to do and requires me to build a fairly complicated jig


Since this is a proof of concept, lets stick with the basics and go with a finger joint.  If I like how it works, we can always try something fancier.

Wood:
For the first attempt it's always best to go with stock pine.  I'll use furniture grade 1x6's for the sides and top grade 1/4 inch plywood for the top and bottoms.  I've got some 1/2 inch stock to use as a frame for the top but may bump that up to one inch to prevent warping.  If I don't botch this up, I can always use better quality wood like walnut or oak for future "Show-Off Boxes"

Features:
OK here's were I need your help - what else shelf the box do

- I'd like if to have an ability to hold open a rule book (like a cook book stand)
- have a compartment for small items (dice, markers etc)
- be stackable (I may store these in a slotted tray so that might not be a goal)
- what would you add?


Tuesday, November 10, 2015

Fall-In 2015 Con Report Part 3: The Loot

 The last of my Fall-In 2015 reports - what the heck did I buy?  Actually it's a pretty limited haul and shows my current leaning towards making terrain over painting mini's.

Only two miniatures were purchased - a unit of 15mm Swedish Reiters (cavalry) for my By Fire and Sword collection and a Armored War Elephant in 28mm from Sgt Major Miniatures.  The rest if the items are terrain related including more crops and scenery details.

I also picked up an armored weathering kit just to try and refresh my vehicle painting style.

I just didn't have a need for a lot of new miniatures.  I've got 3 boxes and a good number of metal Perry's already in "inventory" for my next AWI project.  The only thing I really "need" (OK, I'm being generous to the definition of Need) is a few more British infantry and cavalry units for my Napoleonic collection.  also maybe some Spanish and Portuguese also.....

Hmmm, maybe this meme is still accurate.