Saturday, November 30, 2013

Comparison Shots of Type 92 Tankette

 I was asked to post some scale shots of the 3D printed Type 92 Tankettes and some of my other 28mm stuff.  First up, a few pictures next to three 28mm infantry figs (from left to right 2 Battle Honors figs and a plastic Warlod figure)

 Another view.

 Here's a close up with the plastic figure on the right.

Lastly, a comparison shot with a 1/56th scale Chi-Ha tank from Company B.  I think Nate hit the scale right on as these little vehicles look to be in scale

Prep Work for the Challenge has Begins!

Just like the 60 other participants in this years Analogue Hobbies Painting Challenge, I have been focusing my hobby time on prep-work ahead of the Dec 15th start date.

First up for priming is a rather ecletic tray of 28mm stuff.  Starting in the upper left and moving clockwise are
- 13 French & Indian War Figs I'm doing for my Bloggers for Charity Contribution
- 30 Perry Dismounted Cavalry (18 Confederate and 12 Union)
- 3 Blitzkrieg Models tanks (Panzer III J, Matilda 2 and a Grant
- A Core Sec Engineering Higgins Boat
- Yet another Perry Confederate Infantry Regiment (24 figs)

My goal is 1,500 points this year.  The tray above will tally in at around 425 points (assuming his most honorable and munificent lordship Curt allows me a few extra points for the Higgins boat given its size).

One of the things I like most about the challenge is that it provides a reason to go in and mine some of the lead and plastic I've accumulated over the years in this hobby.   I'll pause here for a moment as I know it's a shocking revelation that a gamer has a stash of unpainted miniatures….

OK everyone settled down now, good, lets proceed…

The competition is a great opportunity to delve into the lead mountain to paint up stuff that's accumulated.  For me it will be 15mm Flames of War stuff as I'm starting to get back into the game thanks to a very fun outing with WWPD Luke at the Flames of War doubles tournament at Fall-In.

Enough talk, back to priming

Friday, November 29, 2013

3D Printed Japanese Type 92 Tankettes Completed

 I manage to finish painting up the two Type 92 Tankettes I received from Nate.  These models are 28mm scale and were designed by Nate via on the computer and then 3D printed.  I must say that they were a joy to paint and I'm a big believer that this technology will have a big impact on our hobby.

 A close up of one tank - you can see the layering effect caused by the printing process on flat surfaces, such as the turret side.  It's invisible anywhere there is detail - the engine grill vent in the back.  I think the effect looks great.  I'm not sure what material Nate used (there are lots of options) but it holds up well.  The only issue is the long heavy machine gun barrel droops a bit but that can be easily fixed with a bit of thin brass rod.

 The second tank looks that same but I needed to replace the medium machine gun in the turret with some brass rod.  Remember these are just Tankettes (a little more than two inches long) so there very small.  The tanks are perfectly scaled in 28mm but have roughly the same physical size as a 15mm Sherman tank.

 The brittleness of the material is about the same as a resin model.

Overall, I'm am very happy with how they came out.  You can follow more 3D printing adventures over on the WWPD forum here.

Thursday, November 28, 2013

Happy Thanksgiving from the Uber Geek

Just a short note from the Lair wishing all of you and your families a happy Thanksgiving Day.

Here in the Lair, it's the quiet period before the storm of preparation begins.  I think I find the frantic preparation of the feast as much fun (maybe even a bit more fun) than the actual eating itself.

My wife prepares a legendary meal and what may be even more myth-building is the kitchen mess she can create.  At times, I think she secretly takes handfuls of flour and just throws it in the air.  Of course, there will be the inevitable Thanksgiving Day challenges to be faced - the panic of a missing ingredient, a dropped pan (ahhh, the year of the para-turkey!), a spilled glass of wine - all things that will be overcome and transform from crisis to cherished memory.

But the main theme of the day is to be Thankful for what we have and I find my self with an overflowing cup there.  We're all healthy and, with my son is home from college, we're all together so what can be better than that?

Have a great day, enjoy the football and be thankful for what you have.

Wednesday, November 27, 2013

4Ground Ruined House #2: Let's Play Dress Up

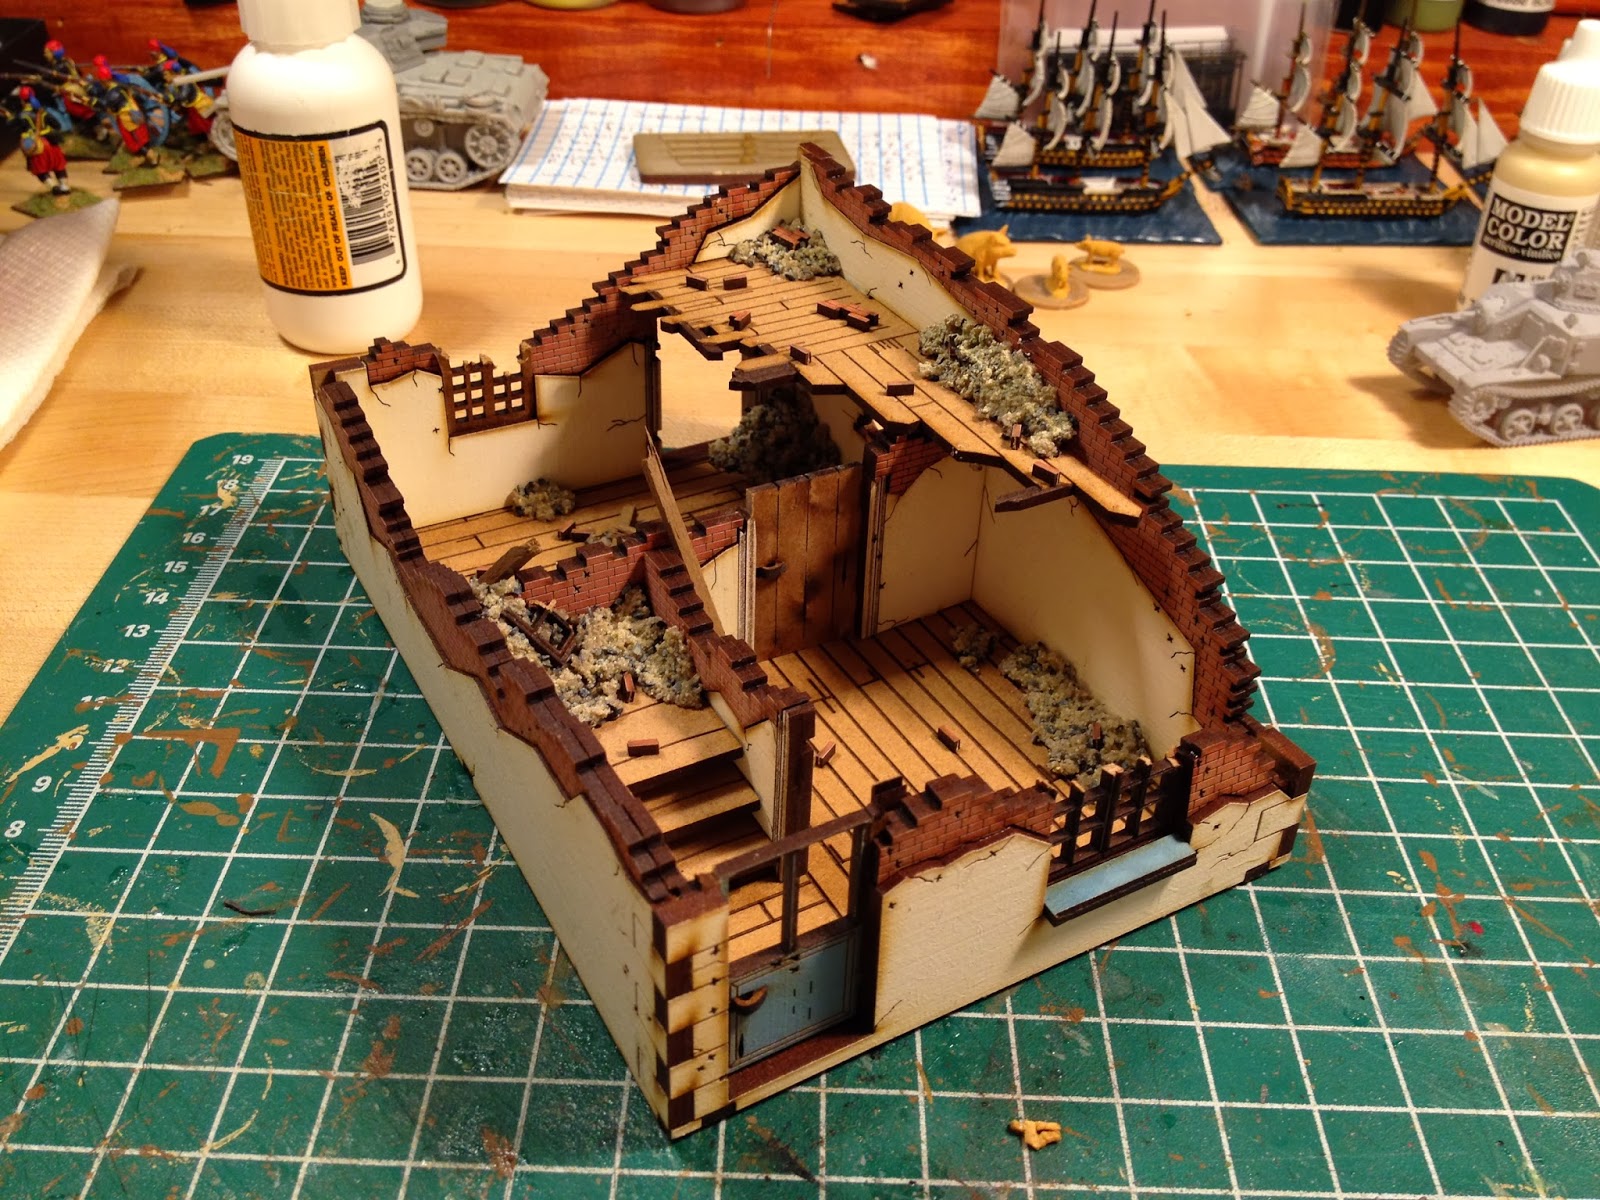
The first picture shows a finished model of the 4Ground Ruined Hose #2 kit.  It's a great kit but, to me, it's looks both too angular and clean - every things a right angle and there is no rubble.  I wanted to take a stab at "tarting-up" the model by adding some simple details.  I also need to keep the additions limited so there's still room in the structure to place figures.

Here are the limited materials I used
- a slurry of playground sand, model railroad ballast and matte medium for rubble
- Some basswood for timbers - painted with Vallejo Biege Brown (874) which matches the floor boards closely
- The precut brick rubble provided with the kit

 And "viola", a dressed up version of the structure.  I went with a restrained application of the rubble and then dry brushed it beige to match the color of the "plaster" covering the walls.  I also interested brick sections and window frame parts to add to the effect.  The slurry dries rock hard after 30 minutes and once that happens it really isn't going to move.

 A handful of timbers were added for more visual interest but I tried to keep them out of the way so figures can still fit in the model.

One last shot.  This project was both simple and fast.  I think I spent 30 minutes putting everything on and cleaning up but the result is acceptable.

Note: my post can also be found on the WWPD Bolt Action site


Sunday, November 24, 2013

Planning for the Challenge Part Quatre

Curt must have special powers - no sooner does he announce that the theme of this year's challenge is Sam Peckinpah's "The Wild Bunch" than it pops onto to AMC yesterday.  So three hours of desperately needed prep time was consumed by watching the flick.  What a feel-good, happy ending to that one!  It's a great movie and a very worthy theme for the challenge.

Now it's time to start planning for the event, what I'll paint, when and (new to this year) which of the "Fortnight Theme Bonus Rounds" to participate in.  There are 6 and each concurs a 50 bonus points for participating so they'll be a big source of getting me over the 1,500 point I set.

Scoring is based on painted figures.  Most of my stuff will be 28mm which scores at 5 points per infantry, 10 for cavalry/artillery, and 15 for vehicles.  I'll also do a good bit in 15mm which tallys in at 2 for infantry, 4 for cavalry/artillery and 6 for vehicles.

Sadly, I have enough figures in the old lead/plastic file to make my quota this year but I'm still figuring out what to do.

I will likely combine the challenge with pulling off a convention game at Cold Wars - just to increase the pressure a bit - there's nothing that motivates painting more than the threat of public humiliation via a poorly received convention game!  I think a big ACW Battle using the Longstreet rule set is in the "cards".  I'll need to complete another 5-10 or so confederate and union regiments to be ready.

So whats on the prep table?

ACW:
120, 28mm Confederate Infantry (Perry plastics) - need to be assembled and primed
18, 28mm Dismounted Confederate Cavalry (Perry Metals)
12, 28mm Dismounted Union Cavalry (Perry Metals)
4, Batteries of ACW Artillery (Perry Metals, 1 gun / 4 crew each)

Flames of War:
15, 15mm T34s (PSC plastic kits) - I need to decide if these will be WW2 Soviets or Arab/Israeli War Egyptians
4, 15mm Marder III's (Battlefront)
An uncountable horde of Soviet Infantry (PSC plastics)
8, 15mm German Halftracks (250's / Battlefront)
5, 15mm Stuarts (PSC plastic kit)

Bolt Action (28mm WW2):
38, 28mm German Afrikakorps (Perry plastics)
1, 28mm German Panzer III/J (Blitzkrieg Models)
1, 28mm Marder II (Blitzkrieg Models)
1, 28mm Honey Tank (Blitzkrieg Models)
1, 28mm Grant Tank (Blitzkrieg Models)

All Quiet on the Martian Front:
- While technically not in the lead pile these will arrive in January and it's a whole bunch of stuff coming.

Let's see what I can get prepared by 12/15/13 at 12:01am CST!


Saturday, November 23, 2013

3D Printed Type 92 Japanese Tankette

 There's a interesting thread over on the WWPD forum by Nate (aka Rabid Monkey) that discusses the design and creation of 28mm vehicles using CAD software and a 3D printer.  Nate is an extremely well skilled operator and one of his creations is a 28mm Type 92 Japanese Tankette.  It's so nice I bought two!  Each model comes with 11 pieces which are pictured to the left (oops, the turret is missing - well wait for the next picture).

 The model goes together extremely well - the part fitting was perfect and the detail is amazing.  As per Nate's suggestion, I used super glue which does bond very fast given the porous nature of the printed material (its a type of ABS, I think).  Test fitting all the parts is a must.  As these are pro type models they're a bit delicate - the sharp eyed amongst you will notice that I replaced the Medium Machine gun on the right turret with some brass rod.  I broke the gun off and lost in the carpeting under my workbench.  I think there's enough missing parts under the workbench for a whole army, but that's material for a future post.

 Next is a shot of the Type 92's primed.  As with most of my miniatures, I prime with grey auto primer as it helps me see the details and its' both very reliable and cheap.

A picture from the reverse side.  The detail that can be added via the 3D printing process is amazing.  For example the inside portions of the tracks and wheels are detailed and the rivets are both at scale and easily visible.

3D printing technology is still in it's very early stages and currently requires both a very talented designer and a fairly expensive piece of equipment.  I think it has great promise for just in time manufacturing and our hobby in particular over the next 5-10 years.  Similar to the way we can buy rules on PDF's or configured for tablets, I think we'll see the day when figures are purchased via the download of limited use cad designs which we then print out a preset number of copies.

Very exciting stuff.

Friday, November 22, 2013

Fall In 2013 Bolt Action Tournament: Learnings

I thought I would post my key learnings I took away from the Fall-In Bolt Action tournament. The most obvious learning is the realization that Stefan (Sheck2) puts on a grand event and we are all very fortunate that he does given the huge amount of effort he puts forth - thanks again for a great event.

I played Japanese and overall still really like them as a tournament force. I went 2-1 and came in 6th so was very pleased with my showing. I got lucky and won the "First Tank Kill" award for the second round but it was against one of my own tanks as I loaned an army out to another player so that's a bit tainted.

Here are my take aways:

(1) I was surprised at the low number of axis players (4 out of 19). That meant a lot of blue on blue games which is OK. Of course as the sole Japanese representative, I only played allies. I suspect this will change by Cold Wars as the Finns appear to be the new Hotness right now.

(2) From a Japanese list perspective the 2 new "unique" units for the army - the suicide AT guys (SATG's) and the bamboo spear squad are very effective units when used for their role.
- The SAT'G's draw a lot of fire so I highly recommend taking vets (at 26 points each). I took out 3 tanks with these guys and when not directly attacking the vehicles their
presence made my opponent very nervous and cautious and consumed order dice as his units targeted my SATGs.
- I had one Bamboo Spear 15 figure squad and it rocked - at 75 points for the unit you can play with some abandon. In my second game this unit accounted for at least 300
points of enemy kills. Of course there were only 5 guys left a the end of the game but that's part of the "charm"

(3) I took a Ho-Ro assault gun with a 150mm howitzer (155 points @ regular, 7+ armor, open top). It's a fearsome weapon on paper but didn't really do much in the tournament. In my first game with Mike (the guy with a plan) his 4 shot Crusader AA tank made short work of it. During the second game the tank survived but didn't score any hits and in the third game it managed to kill a squad before being silenced in turn 3 by John B's M-10. Next time, I think I'll get a regular gun and use the freed up points for a tankete.

(4) My basic infantry squad was 12 regular rifle men vs 10 with a light machine gun from last time. The new configuration worked a lot better (12 shots vs 11 and 12 dice in close combat vs 10). The extra close combat dice are really key when playing the Japanese

(5) I need to spread stuff out more - in all three of my games I got hit by either arty or air that managed to hit 3-5 units. I also forgot about the option to go down to halve hits.

I will definitely play the Japanese again at Cold Wars, but will tweak my list. I need to find some games in the DC area to "test"


Just to repeat, the tournament was a great experience and in addition to thanking Mr Stefan, I'd like to thank all of you other competitors who make playing this game so much fun.

Thursday, November 21, 2013

4Ground Ruined House 2: A Review

 I continue to see lots of the new 4Ground laser cut buildings and Fall In was no exception.  After playing on a few tables with the terrain pieces during the Bolt Action Tournament, I decided to take the plunge and pick up a few of them at the Vendor Hall.  The first one up for review is the 28mm "Ruined House 2".  The kit come flat packed which makes them very easy for retailers to stock.  The kit had a price of $25.00 US.

 Components:
So, what's inside the plastic bag?  There were 8 sheets of laser cut wood.  As you can see, sheets come in different shades which allow the kit to not require painting when completed.  The planning that goes into the layout of all the parts is very, very impressive.  There are a lot of small details that are either cut onto the parts themselves (bullet holes, knots in the wood planking) or are separate pieces.  For example, the red sheet (center / front sheet) is used for the exposed brick work has extra brick sections to use as rubble including 80 individual bricks.  All of the components where very well produced and the sheet coloring was well done.  The only thing I can ding 4Ground on is the instruction sheet, which is a color fold out that shows how all the parts go together.  I find 4Ground's presentation style to be a bit confusing but that's a minor nit.  Build Tip 1: ALWAYS test fit parts before gluing, it's easy to get a bit confused as to which part goes where.

Components: 9 out of 10

Assembly:
It took me roughly 45 minutes of build time to complete the model and, as advertised, it's ready for the tabletop (more on that later).  I used standard yellow wood glue for the model and all the parts fit together snuggly.  The walls of the house are two parts Outside and inside facing so the both sides are "painted" but it also adds a good deal of strength to the kit.  I did my standard drop test from 4 feet and nothing happened.  OK, I don't really have a standard drop test (dropping one of my resin kits are you crazy?).  I accidentally dropped the finished kit and it survived the fall intact!  There is a surprising amount of interior detail, walls, posts and stairs.  The plank flooring is well done.  I was a little skeptical about building the stairs but they proved to be an easy assembly.  The stairs are designed to accommodate a 25 mm round base so 28mm figures can be placed securely on the stairs.  Build Tip 2: Don't remove parts from the sheet until you need them.  There are part numbers printed on the sheet next to the parts (not on them) so it can become hard to identify parts once they are separated from their part number.  This should just be a model kit, not a puzzle and model kit.

Assembly: 10 out of 10

 Finished Kit:
The finished kit looks good and is ready for the table top.  I was very impressed by the model but do have an aesthetic issue with the appearance - it's too "straight liney".  What does that mean?  As the model is assembled for sheets of plywood everything is angular, flat and "clean" - there's nothing "round".  A demolished house would have piles of rubble which don't lend themselves to being represented for flat sheet of wood.  I think this is an easy fix by adding some rubble mix and using the 80 precut individual bricks provided with the kit.

 Another view of the model which shows the stairs.
Finally the other side of the kit.  My next step for this model will be to "tart-it-up" with some rubble and debris.  I'll use a slurry of fine sand, rail road model ballast and the kit's bricks to make rubble and use my band saw to trim some planks from the frame that held the floor parts for some timbers.  The key is to add enough rubble/debris to soften the angular look without taking up too much room as models still need to fit into the house.  That project will be the subject of another post.

Finished Kit: 8/10

Summary:
Kit Components: 9 out of 10
Kit Assembly: 10 out of 10
Finished Kit: 8/10

Overall: 9/10 - Highly Recommended

I'm confident that I'll be raising the score of the completed kit once I'm done adding a small amount of debris.

NOTE: This post first appeared on the WWPD Bolt Action Blog

Monday, November 18, 2013

The 4th Annual Analog Hobbies Painting Challenge - I am sooooo in!!!!!!!

The Analogue Hobbies 4th Annual Painting Challenge is coming up again!  This event is sponsored and run by Curt C., the author of the excellent Analogue Hobbies blog and it's become one of my favorite gaming related events of the year.  The challenge starts on December 20th and runs through March 20th and essentially is a race between all of us to see who can paint the most toys in the that frame.

I usually combine the challenge with a goal of hosting a convention game that uses the majority of the mini's I've painted and will do the same this year.  I managed to paint up 10 Confederate 24 fig infantry regiments last year so it's a good motivator.

The big news for the 4th challenge is that the field of appropriate miniatures has been expanded beyond historical's and can now include sci-fi and fantasy.  That works well for me as one of my planned game expansions is "All Quiet on the Martian Front" from Alien Dungeon.  Thanks Curt!

Assembly and priming of the mini's is allowed before the start - so I've got so model prep work to get done!

Back from Fall-In 2013

 I got back from the HMGS Fall-In convention yesterday and I'm pleased to report I had a great time.  I spent both days playing in tournaments - Friday was the Flames of War doubles tournament and Saturday was Bolt Action.  Both events were a blast.  Pictured are the three objective markers I made as gifts for my opponents in the Bolt Action tournament, which is now becoming something of a standard practice and is useful in reminding us that these games only are fun if everyone is having a good time.

 I was fortunate to be paired with Luke Melia (WWPD) for the FOW doubles tournament.  Luke is great guy and a very experienced Flames of War player and I was grateful he let a tournament noob like myself tag along and learn the ropes.  He also designed the list and provided the troops!  Yes, I was pretty much just dead weight.  We fielded a german infantry teams that were backed up by 8 Marder IIIs and a King Tiger.  Pictured is our first of three games vs a US armored force and we got stomped!  We lost the second game but it was a much closer and then we won the third.  Perhaps that was me coming up the learning curve.

I did have a great time at the event and definitely want to get more playing time in with FOW.  Thanks Luke!  I spent Friday evening playing the Board game Eclipse, which was fantastic - it's a really fun game that rewards strategic thinking and will be added to my Christmas list.

 Saturday brought around the Bolt Action tournament, which I thoroughly enjoyed.  My first game was against Mike P (Mike with a Plan) and his Brits.  I fielded my Japanese force and we played on a table that featured the 4Ground Hotel Complex which is an amazing model - all the interiors are detailed (Ok, it's more doll-house than war gaming terrain!).  My game with Mike was fantastic and went down to the last turn.  Mike earned a well deserved win.

 My second game was against a very new player who was borrowing my 8th army to field a force. He played well but didn't understand the rules so I managed to win very handily so I received my first win - but it should have an "*" next to it, since I beat both a new player and my own army!

My third and final game was against John Brader and his mixed US force.  This was yet another great game and showed how the variability of the rule both given and taketh away.  This games example involved US Airpower.  He rolled a "1" for his first strike which means I got to place were it arrived and he lost a squad.  On turn three, John called in his second strike and rolled much better and I lost a squad and got a bunch of pins on 4 other units.  The game went back and forth but I managed to eek out a win on points as neither of us could capture our objectives.  At the end I had 2 wins and 1 loss and, more importantly, I had a great time.

Sorry for the lack of pictures but I tend to focus more on the games than taking pictures.  Overall it was a great con and I'm looking forward to Cold Wars which is the next HMGS con.

Monday, November 11, 2013

For Sale at Fall-In and More Japanese Done!

 A very good friend of mine, Mike M, will have some painted 28mm figures for sale this year at Fall-In.  They will be on display at the Architects of War booth.  First up is a nice sized 8th Army made from 28mm Perry and Blitzkrieg Models.  I think the camp on the Matilda II is very well done.  Also for sale (in the next photo) is a 28mm Confederate infantry brigade (again Perry figures).  Mike's done some work for me in the past and he's both a top flight painter and very good person.

The last few figures of my Japanese force for the Bolt Action tournament are nearing completion.  In the back row are 5 infantry figures which ail be used to bring my Bamboo Spear unit up to the max 15 figs.  Yes, I know, that 4 of those figures have rifles, but you see they are unloaded!  The flag bearer has a bayonet attached to the end of the flag pole so that's kind of spear-like.  In the front row is a two man flame thrower team an extra rifleman and, lastly, a figure with a captured Boys ATR.

 I also completed two crewman for the 150mm cannon armed Ho-Ro assault gun.  I didn't do the good of a job on those guys so the picture has to be fuzzy.

Another picture of the Ho-Ro.  All that's left to do is the flag and rifle banners and then scenic the bases and I'm ready for Fall-In!

Saturday, November 9, 2013

Yet More 28mm WW2 Japanese

With Fall In less than a week away there isn't much time to finish up my Japanese army for the Bolt Action tournament.  The final figures are on the painting desk now 6 Infantry, 1 Anti-Tank Rifle, a 2 man flamethrower team and some crew for the Ho-Ro assault gun.

One of the infantry figures is a flag bearer and just for fun I added a bayonet to the end of the flag pole so the figure will qualify as a Bamboo spearman.  It's a bit silly but what the heck.

Monday, November 4, 2013

New Orleans

 I just got back from an extended weekend in New Orleans.  My wife is President of the American Womens Dental Association and they had their main meeting along with the American Dental Association in New Orleans this year so I tagged along as "arm candy".  MB and I used to live in New Orleans so we know the city well and look forward to catching up with old friends.  I will spare you the "tooth-talk" form the dental convention.  Lets just say that with 20,000 dentists and oral surgeons in town, I'm sure that the NOLA Police Department had to put on extra shifts to control the mobs.


 New Orleans does have the National WW2 museum, which is worth the trip in itself.  The museum is very well done and has lots of interesting displays.  The more interesting part is that there are literally hundreds of video and voice testimony's of the experience of veterans dying the war which makes for a very moving experience.

 On the way into the museum there are some german artillery - a 75mm infantry gun and a….
 88!

 The main part of the museum is in two parts, one focused on D-Day and the other on the Pacific.  The Pacific section is particularly well done and conveys to the public how brutal that campaign was.
 We also went to a new exhibit in New Orleans - the Audobon Insectorium!  Those of you wo know New Orleans, know the insects are a constant "friend" so NOLA is the perfect place for such a venue.  I manage to get my wife in because there's a butterfly garden at the end of the museum.

 Ahhh, the cockroach exhibits!  According to my wife I was channeling my inner 8 year old very effectively at this point

 Don't worry - you can participate via the cockroach cam!  I feel the need to share this with everyone.
The spider exhibits were a lot of fun - here's a pictured of a wolf spider.

The butterfly garden was also a lot of fun - hint wear something white as the butterflies are attracted to light / bright colors and will land on you is you stay still.  Its pretty cool to have a few dozen of them on you at a time.

Anyway we had a great time in NOLA but it did cut into my prep time for Fall-In.